Hidden Bend Retreat, Romney West Virginia

Romney, WV

Sunday, July 25, 2010

Deck Railings Started


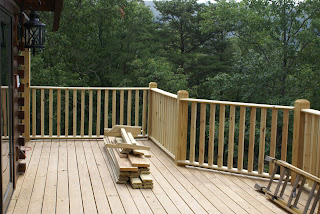
The deck railings were delivered this week and the carpentry team started the install. These were custom made to specs from our builder. The main feature is the pickets in the railings are 2 1/4" square instead of a standard 1 1/2" picket. The larger size really looks good with the log house. The rails are made from pressure treated pine which will eventually have a sealer applied. This most likely will be done by us next summer, once the wood has completed drying. All the decking will be done in the same manner and will most likely be left the natural color.

Pictures show a few sections of the railing which are about 40" high, a bit higher than we've had in previous houses but feel pretty good when standing next to them, should be a perfect height to set a beverage while enjoying the view. The first shot is Ryan and Matt as they prepare to set the first section.

Wood Floors


The flooring company was here this week and the wood floors are complete. The floors are solid, 3/4" red oak in random widths of 3", 4", 5", and 6". Looks great and was completed in only two days. The wood floor is used in the great room, dining room, hall, office, and master bedroom.

The floors are to be sanded and finished on site but this won't be done for a week or so. The floors will be stained before the top coats are put on to darken them a bit and to help bring out the grain. There are a number of knots and imperfections in the floor which we like but the installers made sure that all the knots were tight and wouldn't come apart as they were working. The loft and upstairs bedroom floors will also be sanded and finished on site by the same team from Tripp Flooring.

Pictures show the flooring ready for installation and a couple of shots as the work progressed. You can also see where the kitchen and great room floors come together. There are a number of floor outlets in the great room area including two near the stairs that will be used for our aquarium.

Geothermal Wells Drilled


The wells for the geothermal heating and cooling system were drilled this week. There are 5 wells, each 180' deep. The wells are 15' apart from each other to allow enough space for the heat exchange with the ground to take place and not be affected by another of the wells. Drilling was done by Miller Well drilling, a local company here in Romney.

After drilling, the piping that will be used for the closed loops are lowered in to the wells and then secured with a clay grouting. The grouting allows the liquid that will eventually fill the pipes to have good contact with the ground for the required heat exchange. In one of the pictures, you can see that a length of steel pipe was secured to the bottom of the pipe before it was lowered in the well, this keeps the pipe straight while being lowered and also adds some weight- the pipes are empty at this time and full of air so would have a tendency to float back out if not secured and weighted.

Now that the wells are complete, the HVAC company will come back to tie all the wells together in to a single, long loop and then install the rest of the system and ducts. Once the loops are connected and the system is completed and tested, these wells and piping will be buried under the yard and won't be visible. We're hoping to see really small electric bills with the system and there's also a 30% tax credit for the equipment and installation to help with the payback. During the cooling season, heat from the air will also be used to heat our hot water further decreasing our electric costs.

The gray material that covers the ground is the rock that has been drilled that is brought to the surface by water during the drilling process, although it looks like concrete, it's not solid and can be cleaned up.

The pictures show the work during various stages of the process. You can see the loop of black pipe hanging from the well rig in one shot while it's being pushed in to the well. Because of the uneven ground, it was interesting to watch the work it took get the drill tower level, the truck was well off the ground for a couple of the wells. The last picture shows a well after the piping was inserted and the grout was completed.

Interior Wood Doors


Here's a few pictures of the interior wood doors we're using. These are solid pine and we really like how they turned out, a lot of knots and other defects in the wood to give some variety. The first picture shows the doors after the first coat of stain- the same stain for the rest of the trim is being used for the doors.

The other pictures show one of the doors installed in the master bedroom and one showing the handles we plan to use. These are a lever style and an oil rubbed bronze finish as is being used throughout the house.

Tile Floors


Randy, the tile installer spent a busy 4 days at the house getting all the tile floors down. The floors will be grouted later but so far, they look great and we're happy with the color selections we've made now that we see them in place and in natural light. Here are some pictures of the tile work.

The first picture shows the mudroom with the durarock that is set first to provide a solid surface for the tile. Tiles are then laid using thinset mortar. The second picture is the upstairs guest bath, next is the master bath, and the last picture shows the kitchen. The tile in the master bath is the same as we're using in the mudroom.

You also get a good view of the wood interior doors we're using throughout the house in the kitchen photo. These are double doors for the pantry. Will show a picture of the doors with the first coat of stain in another post.

You can click on the pictures to get a larger version of the photo.

Stairwell Set


The stairway to the loft was installed this week, it's made from 4" thick pine and took 6 people to lift in to place. The main stairs end at a raised landing on the first floor and then there is one additional stair to the main floor level. Railing material for the stairway and loft is on site and the railings will be constructed to fit the stairs as set. We'll be using 6"x6" pine posts to support the railings and the pickets will be over 2" square, will get pictures of the railings once it's set. The holes for the bolts that secure the stair treads will be plugged with a pine dowel once the stair work is completed.

Donna and I visited the house on Saturday to bring her up to date on all the progress, she enjoyed using the stairs to reach the second level instead of ladders. Our dog, Jazzie made her first trip to the upper floors as well.

Here's a picture.

Sunday, July 18, 2010

House Interior Work


More progress inside the house. The drywall has been completed and is ready to be painted, oh no, another decision to make on the colors to use! The trim for the windows and doors has been pre-stained and is ready to go, the carpenters will start to install the trim this week. Here are a couple of pictures of the drywall.

The stairs to the loft were delivered and should be set in place next week. These are made from heavy pine timbers (treads are about 3 1/" thick) and will be stained with a natural finish to match the loft flooring which is also pine.

Butch started painting the trim on the windows as well, the sun made the exterior shot a bit interesting I thought. The hardwood flooring installed visited the house to get the final measurements last week as well. We'll be using random width red oak flooring throughout the first floor except for the kitchen and baths which will be tile. We're trying to get all the high staining work completed so we can get the scaffolding out of the house before the flooring crew arrives. Enjoy the pictures.

Workshop Progress


Amazing progress on the garage/workshop last week. The building is dried in and ready for shingles. Despite the hot and humid weather, the carpenters made quick work of this project. Just a few minor things left to do besides the roofing and then it will be ready for me to finish the exterior and start working on getting set up inside. Plan is to use board and batten siding and I hope to order the materials in the next week or so.

The building is 28'x36' and there is a set of stairs from the garage on the first floor up to the shop itself. There are only two windows in the building as I wanted to maximize the wall space for shelving and for tools. I made a mistake on my current shop and added too many windows, the light was nice but didn't make up for losing the wall space. Water from the well is in the building so will be able to put in a utility sink and toilet. Still have to determine how I'll finish the inside and adding heat. Here are some pictures of the construction in progress.

Propane Tank Buried


Amerigas arrived on Wednesday to set the 500 gallon propane tank. We went with a large tank because of the back up electric generator, hopefully the first fill will last for years! The Custom Contracting team dug the hole and the trench for the tank on Tuesday. I used my small tractor (many trips) to cover the tank with stone dust once it was in place- took a couple of hours to get it covered but we're ready to go. Once the gas lines are run within the house and connected, Amerigas will come back out to pressure test the installation and set the regulator. Here are some pictures as the work was completed.

Friday, July 9, 2010

Trim Stain


Butch spent the week on pre-staining the wood that will be used for trim throughout the house. These will be the same Dark Oak color as the interior beams and the exterior walls. We'll have the darker trim around all the windows and doors. This was hot work in the basement but a lot of the trim is now ready to be hung.

The first picture shows the staining going on in the basement, most of the stain was being applied with a small roller, then brushed to get the final appearance. The second shot is of the trim drying outside before being stored for use.

Exterior Lights


Dave T. started putting up some of the exterior lights along with more of the interior lights. The first picture shows the deck lights on the large window wall and the second picture is a light on the back of the house. Same style but smaller, there will also be two of these smaller lights outside the doors on the basement level.

The last picture shows the hanging light outside the front door. There will also be a post light near the stairs on the front deck as well.

Garage/Shop Started


Work started as planned this week on the garage/workshop. Quick progress even under some pretty extreme working conditions, it was over 100 degrees for a few days and the humidity way up, really miserable out in the sun. Here are some pictures. You can see the main beams were set and the garage doors roughed in. Then the floor joists were added and the main floor sheeting. The steps that reach from the garage to the shop are on site but won't be installed until the roof is up. When I left on Wednesday, the carpenters were starting on the shop walls so should be a lot of progress when I go back on Monday. The front and back (the longer walls) will be built first and then the roof trusses can be set. The end walls will then be built from the floor to reach the trusses, should be interesting!

As you can see, there are three garage bays, the one where the stairs will be will be narrow but there should still be enough room for the small tractor and Bobcat to sit in that stall out of the elements.

Followers