Hidden Bend Retreat, Romney West Virginia

Romney, WV

Friday, May 28, 2010

Shed Roof on Back of House Dried In


Two very hot days of work saw the shed roof that covers the back porch and kitchen on the back side of the house completed. The entire house is now under roof. Doug, Mike, Matt, and Ryan spent some time really 
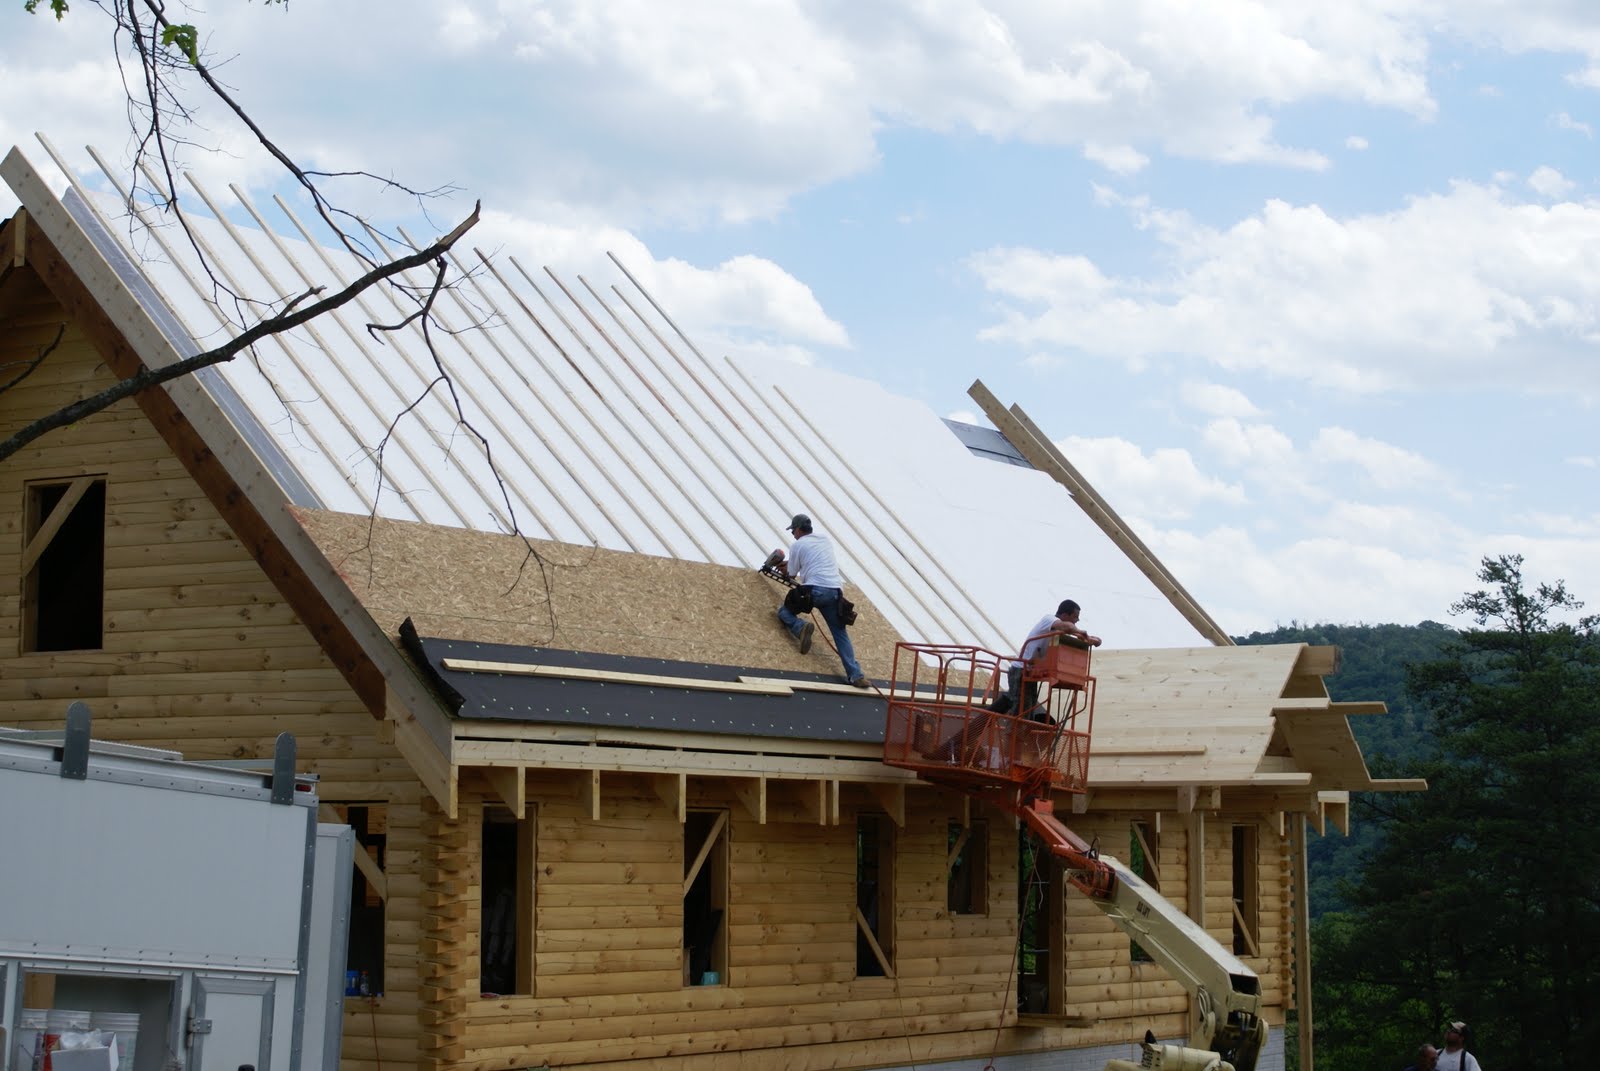
talking through the construction of the roof on the ground before getting started and it all went together as planned. Over the next couple of weeks, the chimney cutout on the front side of the house will be cut in in preparation for the chimney to be installed. After this, we'll see a roofing crew come in to get the shingles in place. Timing is to be determined but work is moving right along.

The first couple of pictures show the rafters being tied in to the existing roof, then the decking and sheeting being applied. One picture shows the underside of the sheeting looking up from where the porches will be built. There will be a rough sawn plywood ceiling in the two porches. Another picture shows a birds eye view of the new roof addition from the window wall end of the house as it was nearing completion. The last picture also shows the addition of a couple of rows of trim boards on the eaves of the house to complete the look, they really dress up the roof line.

BTW, we had another lizard join us to take some sun one evening after work was done. He hung around for a few hours before heading back in to the woodpile.

Interior Work


A lot of work was completed this week on the interior of the house. All of the internal walls have been framed and the wiring and plumbing work is moving right along. Sanding of all the beams and interior log walls was completed (finally!!!) and they really came out nice. After spending the last 5 or 6 days using a random orbital sander for hours each day, my arms are only now starting to stop feeling numb.

The pictures show various examples of the wiring and plumbing work that is ongoing. Also tried to show some pictures of the stain work- the ceilings and walls are being coated with two coats of a clear stain that will give them a smooth, satin finish and help protect them from UV rays as well. This will hopefully keep the original look of the white pine for many years. The last picture shows me (Dave) up in the loft applying stain, thanks to Ryan for getting a rare shot of me at work.

House to Garage Electric Line


Here are some shots of the work to tie the electric line from the house (where the main power panel is located) to the garage. After the trench was dug about 2' deep, holes were drilled in the concrete walls at each end. That sounds a lot easier than it is. Dave T., the electrician/plumber, spent quite a bit of time in the trench pushing the electric drill through the concrete- at the house end of the line, the concrete is 12" thick so takes a while!

After the conduit and electric is run, the hole around the pipe through the concrete is sealed with a fast setting concrete mortar. Then the pipe is covered with stone dust and the hole filled back in. Process just took a few hours helped along by some heavy machinery although you can see that Doc had to spend some time in the trench with a shovel.

Garage Concrete Floor Poured


The first picture shows a view of the shop plan, the 4' overhang on the front was a late addition. We just thought it would look a little nicer and we can put a deck along the front for those days when I like to work outside. Sometimes it's nice to have the planer outside where it can throw chips without having to worry about dust collection. This building will have only a couple of windows to maximize the wall space inside the shop. We'll stain it to match the house and we're using the same shingles as well.

On Thursday, the floor for the garage/workshop was poured- the crew did a great job. Pictures show some of the preparation work to get the gravel base level along with setting markers in the floor to establish the height of the concrete. By the end of the day, the floor was drying well and looks really good- there is a 2" slope from the back of the garage to help drain water.

The concrete stoop for the workshop entrance was also set. Prior to getting the concrete completed, the electrical line was extended from the house to the garage. This involved digging about a 2' deep trench and pulling the electric wiring through conduit. It's going to be great to have electric and water in the new shop! Permits for the garage construction were issued this week as well and the subfloor and framing work will probably start in a week or two.

Current plan is for Donna and I to finish the exterior of the shop (board and batten siding) and add the decking after the Custom Contracting team gets it framed and dried in. Of course, this is subject to change once we see how much work we've gotten ourselves in to.

Sunday, May 23, 2010

Interior Work Continues, Part 2


This is the continuation post to show the additional pictures from the work over the last week.

The narrative describing the pictures is in another post.

Interior Work Continues


Had a rainy week in Romney so work continued on the inside of the house. There was a lot of moving and shifting around to allow both carpentry work to build walls as well as some staining and sanding. The log walls and beams are being sanded with a random orbital sander and by the end of the week, I was hearing the bzzzz sound in my sleep. With better weather coming up next week, we'll be able to get some work completed outside while the sanding and staining continues inside.

Pictures show the stud interior walls going up to define the rooms- the master bedroom closet was the first set of walls that went up followed by the office and the mudroom. Be the end of the week, all the first floor interior walls were set and Dave T. the electrician/plumber was hard at work installing wire and cutting holes for plumbing runs. The master bedroom shower was also set in place before the walls went up.

The 2x6 pine tongue and groove flooring was laid in the upstairs loft area. There will be a large, open loft to the great room and a walled off bedroom and bath as well. The floor in the loft looks great and can't wait to see it sanded and stained. This floor is also the ceiling in a large part of the downstairs area and having only this single layer presented the builders with a challenge. There will be a wood ceiling in the powder room and master bath on the first floor where wiring and HVAC ducts will run but only the one layer over the office, bedroom, and kitchen.

Two pictures show the unique solution that the Custom Contracting team came up with- they split some flooring across the 6" dimension, then routed out a channel where wire can run. This will be used in a couple of areas where a wire is needed and once the wire is in place, the channel will be covered with a piece of metal (to prevent a future puncture) and then the top of the flooring will be glued back in place so the wire/channel is never seen. Hopefully the pictures help show how this will work- one is of a board being cut by Mike to put in place, another shows a piece that has been laid in the floor with wire but the top cover hasn't been added.

The other pictures include one of the one piece shower for the master bath, the front door (the door isn't crooked, I was!) that has been hung, and one final shot of Doug and Mark marking the layout for the kitchen cabinets on the floor. Mark did this to ensure that all will fit as planned before the actual construction of the cabinets is started. You can see how good the loft floor looks and the walls that have been started on that level- the whirlpool tub for the upstairs bath will be lifted in place before the bath walls are constructed. Hopefully, we'll never need to take this one out.

Next week, the plan is to try to get the porch roof completed on the back side of the house which will really define the two porch areas that are on each side of the bump out for the kitchen. One of these areas will eventually be screened in while the second will be open from the dining room.

Donna and I will spend a lot of time in the next few weeks selecting lighting and plumbing fixtures. We visited the Lowes in Winchester on Saturday and were impressed by the large selection of lighting we found and we think we're making progress towards our picks. We have some other lighting sources to consider as well and the final calls for flooring are getting near as well. On the first level, it will be mostly hardwood with tile in the kitchen and bath areas- these are the really hard choices.

Because I'm only able to have 5 pictures in a single post, there are additional pictures related to this update in a second post labeled as part 2. I'll work on figuring out how to get all the pictures in a single post.

Feel free to comment or contact us with questions, thanks for looking.

Saturday, May 15, 2010

Staining and Caulking Started


This week saw the arrival of Butch, the painter, to the site to start the long process of staining and sealing the house. After all the joints are caulked, the exterior logs will be stained with two coats of a Sikkens product, with a color called Dark Oak. The interior rafters, beams, and trim will be given two coats of another Sikkens product made for interior use, low VOCs and all that other good stuff. That work has started and you can see some of the pictures. The interior log walls will have two coats of a Permachink product to seal the wood and leave a satin finish- no stain so will have a nice contrast between the darker stain and the walls.

There is a lot of scaffolding needed to reach the high points in the house and a lot of climbing up and down! I'm going to help with this work for the next few weeks so anticipate some aches and pains.

You can see the caulking on the exterior dovetail joint after it was applied in one picture. Also notice the 2x12 planks that are set across the highest cross beams in one picture. These are to use as a "perch" reached by the scaffolding so stain can be applied to the highest points in the house. The planks will be moved along the cross ties down the length of the house.

It was quite a week on the weather front, we had some warm days but early in the week, it was quite cold in the early mornings, definitely used some more of the firewood that has been generated. I did get a bit more work completed on the paths but probably won't get a lot done in that area for a few weeks as I try to be useful and help with the staining work.

Exterior Work Continues


The main portion of the roof is now completed and nearly ready for shingles. The shed portion of the roof which covers the window side of the kitchen and the two porches on the east side of the house will have to be done first. This should happen in the next week or so if the weather cooperates. Here are some pictures of the back side of the roof in progress, same process and materials as detailed in the earlier post. The crew also covered the open side of the roof with some plastic sheeting to keep the rain out as the interior staining has started as well.

Most of the windows have been set as well, this was done very quickly and everything seemed to go in place very well- there was one window that had some scratches from shipping and this one is being held for inspection and repair. The picture of the end of the house shows the windows after the external trim has been added. This looks really nice- the trim is actually recessed in to a cutout around the window to minimize the gaps and should make for a very weather tight seal. The picture of the windows on the front of the house show the windows just after they were installed, no trim has been added yet. The inside pictures is from the kitchen looking up at the plastic sheeting that was put up this week.

Remember, you can click on the picture to get a larger view.

Visitor


While at the house site this week, happened to see this guy sitting in a tree on the side of the road as I was heading to Romney for supplies. Will have to investigate a bit to find out what type of hawk it is.

Friday, May 7, 2010

Everything Gets Used


I've mentioned the camp fires we've had in the cooler evenings and to start the day as well. All the scrap from the project has given us a pretty large supply of firewood- don't think we'll run out before it's too warm to have a fire!

We also received an update today from Allegheny Power that they should be out to pull the cable for the permanent electric service in the next 7-10 days. I know the construction team will be happy to be off of the 200 foot long extension cords and to see the improvement in the performance of the power tools.

Front Side of Roof Under Felt


There's been a lot of progress on the roof on the front side of the house. The roof for the porch was framed as part of getting ready to continue the roofing work. After some framing was added and supports to keep the foam from getting in to the soffit area, the rigid foam was added to the roof. These are 4x8' sheets of foam that are set in place and cut with a hot knife where needed. After the foam is placed, 2x4 purlins are placed on top of the foam and 11" screws are used to go through the purlin and foam in to the first layer of the roof that is already in place. Then a 1/2" sheet of OSB is added followed by roofing felt- all that remains to be done are the shingles once the back side of the house and the ridge vents are set in place. Here are some pictures as the work progressed.

In the close up shot of the foam sheeting being placed, to the far right, you can see the "can lights" that are in the roof that will light up the window wall end of the house. There is also a picture showing the lights from the ground. There are two lights on each side, hope they don't need to be changed very often.

Followers